Themes & Preferences
A theme is a ScriptableObject asset that holds every setting Hierarchy Inspector uses to draw the hierarchy. You can have multiple themes in your project and switch between them per-user. The default install ships one theme to get you started.
The Preferences pane
Open Edit → Preferences → Hierarchy Inspector. This is the per-user settings pane.
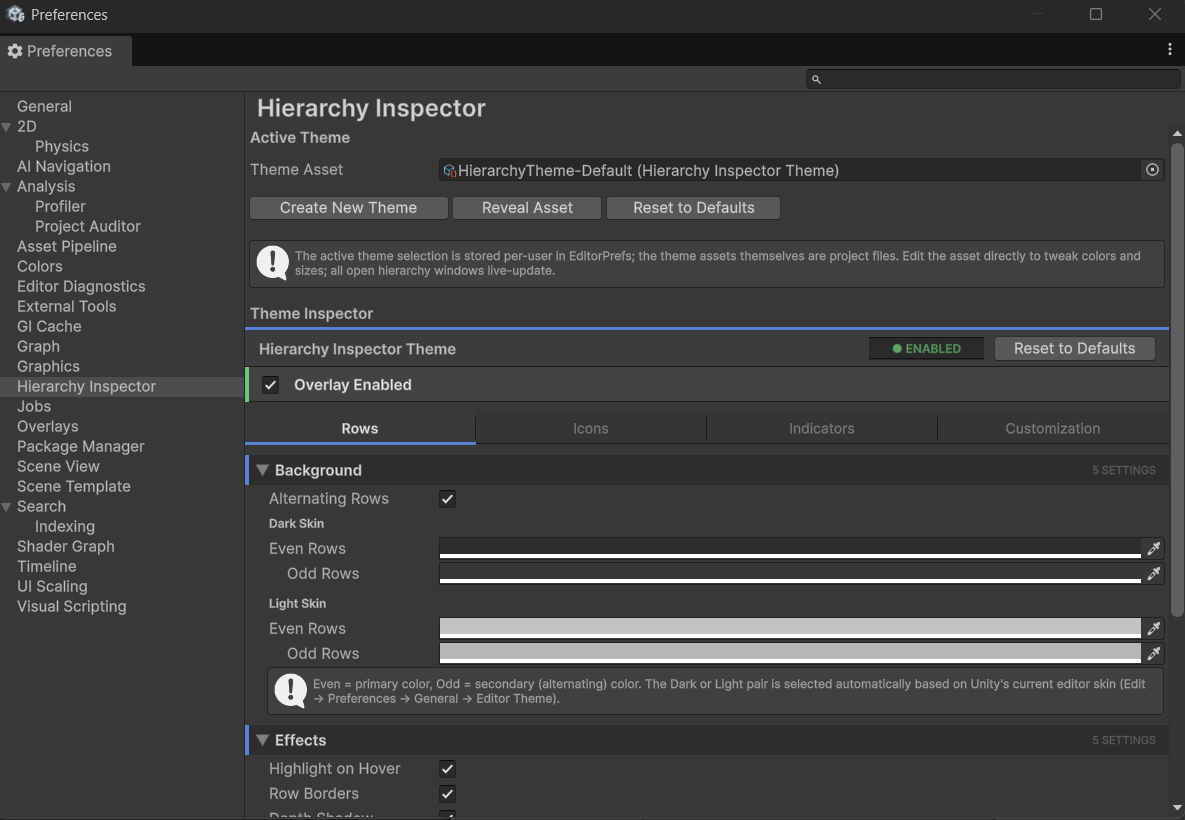
The pane has:
- Theme Asset. The currently active theme. Drop in a different
HierarchyInspectorThemeasset to switch. The selection is stored per-user (inEditorPrefs), not in the project, so different team members can have different active themes without stepping on each other. - Create New Theme. Generates a new theme asset in
Assets/Editor/Themes/Hierarchy/(the folder is created if missing) and switches to it. The new theme starts with the same defaults as the bundled one. - Reveal Asset. Pings the active theme in the Project window so you can find it on disk.
- Reset to Defaults. Restores every field on the active theme to its built-in default. Undoable.
- Embedded inspector. The active theme's full inspector renders right inside the Preferences pane so you can tweak settings without leaving the dialog.
Editing a theme
You can edit a theme two ways:
- From Preferences as described above.
- Selecting the asset directly. Find the theme in the Project window, click it, and the Inspector shows the same tabbed editor.
Both routes are equivalent; pick whichever flow fits your hands. Either way, changes update every open Hierarchy window in real-time. There is no "Apply" button. The overlay re-reads settings on every paint.
The theme inspector at a glance
The inspector is organized into 4 tabs:
| Tab | What it controls |
|---|---|
| Rows | Backgrounds, hover effects, depth, tree lines, selection |
| Icons | Component icons in the gutter, GameObject icons, UI tints |
| Indicators | Prefab tints, missing-script warnings, separator detection |
| Customization | Per-object styling, color effects, toolbar, animations |
Each tab is divided into named sections (foldouts). Settings inside a section are usually a parent toggle followed by detail fields. When you turn off a parent toggle, the detail fields gray out and indent so you can see they exist but are not currently in effect. This is show_if behavior; the detail fields stay visible for discovery, they just become read-only until you re-enable the parent.
The master toggle
At the very top of the theme inspector is the Overlay Enabled toggle. Turn it off to disable Hierarchy Inspector entirely; you see Unity's stock hierarchy until you re-enable. This is a master switch above every other setting.
A status pill in the header shows the current state at a glance: green "● ENABLED" or red "● DISABLED".
Bundled themes
Hierarchy Inspector ships with four ready-to-use themes in Assets/HierarchyInspector/Themes/:
- HierarchyTheme-Default. A balanced setup with all features on at moderate intensity. The active theme out of the box.
- HierarchyTheme-HighContrast. Stronger row contrast, brighter selection (yellow), thicker depth shadows, more visible tree lines. For accessibility, sunlit displays, or large hierarchies that need to read at a glance.
- HierarchyTheme-Minimal. Most decorations off (no row alternation, no tree lines, no animations, no component icons in the gutter, no prefab tinting). Keeps the essentials: hover, selection, missing-script highlight, override dot. For users who want the per-object styling features without the visual noise.
- HierarchyTheme-Vibrant. Saturated palette, magenta selection, warm accent line, icon tinting follows row color. For colorful project styles or fun/casual game projects.
Switch between them in Edit → Preferences → Hierarchy Inspector by dragging a different theme asset into the Theme Asset field.
Creating a new theme
If none of the bundled themes fit, make your own. Two ways:
- From Preferences. Open Edit → Preferences → Hierarchy Inspector and click Create New Theme. A new theme asset appears in
Assets/HierarchyInspector/Themes/and becomes active automatically. - From the Project window. Right-click any folder in your project and choose Create → Tools → Hierarchy Inspector → Theme. A new theme asset is created at that location with default values; drag it into the Theme Asset field in Preferences to activate it.
Either way, edit the new theme's settings as you want, then switch back to any other theme later by dragging it into the Theme Asset field. You can also duplicate any existing theme asset with Ctrl+D to fork its configuration.
Info
If you installed Hierarchy Inspector via Unity Package Manager (git URL or OpenUPM), the welcome window automatically copies the four bundled themes into Assets/HierarchyInspector/Themes/ on first import so you can edit them like any other project file. Only the editor and runtime code stays inside the package; the themes themselves live in your project where you have full control.
Info
Theme assets travel with the project. Anyone who pulls the project gets the same themes. The user's active selection is the only thing that's per-user.